Subaru Ascent Forum banner
101 - 120 of 124 Posts
How was the lift gate install? Was it pretty much plug and play?
-I used to install alarm/RS professionally, so I had all the necessary tools and supplies making it pretty easy. took me 3 hrs
-No, not really.

the light fits into the hole perfectly. I ran a pair of wires (8-10ft) to the cargo light. The hardest part was trying to pop off the panels, fearing that the plastic fastener grab the whole panel and make a hole. The solution is to do a fast-action pull. Having these tools helped.

I think the OLM lights are more bright, but this OEM light (only two led bulbs) is adequate for loading and unloading cargo. For function over form, I think the OLM might be more valuable. Keep in mind that the light stays on for only about 10min or so because it's tied to the door/cargo light.

Would you be willing to post a step-by-step instructable? Or, perhaps, say if the steps followed were the same as for the subispeed light?


Thanks!
 
You're much better off installing a light above the cargo area than in the liftgate. The light is far better being more direct and it's not blocked when you stand in front of the liftgate. I know first hand because I have both. I first installed the liftgate light and was not happy with it. Then I installed a light in the cargo area and the difference was so much better. And, compared to the liftgate light, the installation was considerably easier.

There are dozens of lights to choose from and they cost a lot less than the liftgate light. Here is the one I installed:

Image


Here are the details. This looks close to OEM and no wires are exposed. But you can choose whatever style you like best.
 
Great suggestions from everyone! I went the LED strip light route, but worried a bit about the adhesive too. Here was my approach:

1. Same installation as thisonetimesubaru7x
2. I got bendable aluminum extrusion to mount the LED strip:
 
Great suggestions from everyone! I went the LED strip light route, but worried a bit about the adhesive too. Here was my approach:

1. Same installation as thisonetimesubaru7x
2. I got bendable aluminum extrusion to mount the LED strip:
and
This aluminum strip material:

I cut each to 34" and epoxied the extrusion to a length of the aluminum strip so I had a 'tab' of aluminum strip along one edge of extrusion. I was then able to slip that tab in the seam between the headliner and upper trim piece to mount the light!

pics to follow...
 
pics:

Image

678

679

680


Plenty of light, looks like was meant to be there from the beginning! I used a 194 LED bulb that has built in rectifier so was able to solder to correct points on that bulb to get ~12V and put a mini fuse holder on 12V side with smallest fuse I could find. Hardest part of installation was getting minifuse holder to fit into cargo light slot with the LED bulb also. Just barely fits but have OEM cargo light and new light both working!
 
Adding back photos to this post from a while back.
Image
Image
Image
Image
Image

Super ideas on this thread.

I wasn't happy with my temporary solution (battery powered tap lights), and I went with the Diode Dynamics LED strip that @ThisOneTimeSubaru7x posted above pn DD0192-74 (I got warm white 3000K). Followed his install tips, great stuff.

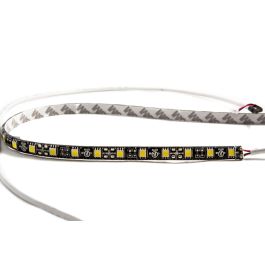
Nice enough kit. Wires are surprisingly thin to me, but the LEDs are drawing very little amps and the wires don't get warm at all so they are appropriately sized. I opted for a somewhat stealthier install, just in case the sticky strip leaves some weathering mark after a 3 year lease. Poked the wiring forward under the headliner into the ceiling recess that holds the third row center shoulder belt, and wrapped the LED strip around the inside edge. Plenty of light, and with LEDs all around, there are no weird shadows. Depending on how hot the strip gets, I might stick a layer of translucent scotch tape on top of the plastic to add some softness to the light.

One mod I made was to solder a bulb socket to the kit's bulb socket take-off adapter (in parallel), so I could keep a lit bulb inside the side light socket. That side light doesn't do much by itself, but I found that I was missing the extra light source when I hooked up the LED. Might also be that my off-center placement in the seat belt recess benefits from the lefty light source. Anyway, the switch now toggles both the side light and top LED strip together. I lined the back of the side light recess with foil, and added insulating tape over the side light's metal contacts so they don't short out on the foil.

Last thing, I replaced the rear most reading lights (the ones between 2nd/3rd rows) with 194 LEDs, pn DD0027P (warm white 3000K, HP5 92 lumens). They are a noticeably brighter than stock bulbs, but not blinding or maxed out, and could probably be turned on at night by the kids and only marginally bother my driving. They help illuminate the back when seats are flipped down, but note that they are on a timer unless you keep a door open.

F.S.
 
 
I don't have pics of the power takeoff. Just using words... it was really difficult to pull power that was slaved to the switch, as the original light housing circuit goes quickly from switch to bulb (really no length of metal to hook to). I also wanted to use the original switch instead of an add-on switch - I just didn't want to have to mount an extra switch, and wanted the original switch to run both lights.

So I somehow had a bulb socket. I think it was from one of those auto parts store LED lights that has a demo mode, using a small battery and a cheap spring switch on the display box to let you demo the light. So I took the bulb socket with its two wires, and soldered the wires to where the OEM bulb would plug in, and in parallel to that I soldered wires for my LED strip. Basically, the bulb socket and wires allowed me to have everything downstream from the OEM switch - new bulb (in new socket dongle), and new LED strip power.

I'll dig around and see if I took photos of that part.

BTW, the LED strip works great, although the sticky back did fail somewhat in the summer heat. Only a couple inches unraveled, as it's packed in there pretty well (almost doesn't need the stickum).

F.S.
 
Thinking about doing Forester 14-18 JDM lift gate light install but I am trying to find a definitive answer to a question first. When you switch off the OEM side cargo light, does the JDM lift gate light also switch off?

There seems to be differing responses to this question...
3834
3835
 
Yes it does if you wire it that way. Otherwise, it switches off whenever the car turns it of but not when you do.
 
101 - 120 of 124 Posts