Some pointers for those installing LED strip lights
alrighty Ascent friends - i decided to go with a Diode Dynamics LED flex strip light for my solution. in hindsight, HIGHLY recommend.
https://www.diodedynamics.com/flexlight-led-strip.html
super easy install, two screws to take out of one panel only, no panel removal at all (just pulled overhead panel down on the left side, and pulled the left edge panels away enough to access wiring) and total time about 15-20 minutes from start to done. easy!
posting to add a few pictures to the mix of this thread that will ideally answer for everyone else a few questions i couldnt answer for myself prior to starting. hopefully will help out one or a few of us out there:
image named "picture 2" shows a view of just how little there is to do...two screw locations, and pop out the lens/light.
image named "picture 3" is a closeup of what to do with the bulb and the wires - easy easy easy.
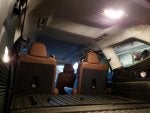
image named "picture 4" is mid-way through the process.
steps i'd recommend:
1: remove screw 1
2: remove screw 2
3: pop out the cargo light with a thin flathead screwdriver along right edge of lens - just takes a little bit of pressure. when it pops free, just wiggle it out and let it hang
4: get a body panel tool, stiff plastic wedge item or *carefully* use a flathead screwdriver to start pulling back panels until they pop. edge of the left side panel that houses the cargo light...just start by peeling back weather stripping a bit to view the panel edge, get something under there, pry it up a bit, and pull with slow but steady force. Pop out enough of this left side panel until you can see and get a hand in far enough to access the back of the light. pop down the left 1/2 to 2/3 of the overhead trim next. 3 total plastic pressure fittings should do it. you now have access to all the spaces you need and all the panels you need.
5: feed wires - you can feed the wire coupling down from above, or feed the LED strip itself up from the cargo light location. it made slightly more sense in my mind to start at the point of connection, and feed the strip up from there...so i just started feeding the strip into the panel through the cargo light opening...keep pulling/sliding/guiding it up around the various bits and bobs. the surface of the strip light is somewhat tacky, so you have to guide it slowly, cant just shove or pull the whole thing up once you've fed a bit in, but slow is good here. i kept feeding it up until the whole thing was up over the shoulder of the left side panel, and hanging down around the header trim (see pic "panels down").
6: back to the bulb: unplug the brown OEM fitting connected to the cargo light.
7: pull out the bulb
8: plug in the wedge adapter that comes with the diode dynamics kit, into the same location where the bulb was plugged
9: plug the wire coming down from LED strip into the other end of the adapter. done with wiring!
10: fold/flex/bend everything up and tuck it all back into the lens opening in the panel, and pop the lens into the panel. done here.
11: i went back up to the header panel at this point and with lots of slack left in the wire, started deciding where i wanted to position the strip. found my spot and pulled of the adhesive backing, and stuck up the new light.
12: now time to snap the header panel back into place, so start pushing 'excess' wire back into the panel, with an eye for how much wire you want to leave exposed after the panel is back in place. snap that thing back in and you're done. dont rush this or start even start smacking away at the panel. you can peek at the gap between the body and the panel to see exactly where each fitting goes. add pressure until they pop in.
13: pop the side panels back in
14: you probably snapped the panels back in with the panel edges laying over the thin edge of the weather stripping on the left side or overhead. find a spot where the weather stripping is flat and flush (how it looks at the bottom or lower left of the panels you pulled out) and roll/flip it out from under the panels.
DONE!
on/off switch in the lens should now activate your strip! stand back and be impressed with your handywork!
if i can answer any questions, let me know!