Subaru Ascent Forum banner

Interior Light in Rear Liftgate

75K views 123 replies 39 participants last post by  joegeib  
#1 ·
A couple of weeks ago, I seem to remember reading something on here about being able to install a light in the Rear Liftgate? I wasn't worried about it at the time... but now I'm noticing just how dark it is back there, and how useful a light would be.

Anyhow, I can't find the thread or the instructions. Can someone provide some info on how to do it?
 
#3 ·
You can follow these instructions... mostly... people suggest running the wires up the left side.

 
#5 ·
Did you get past the part where the bottom part of the trim is removed? There are no screws to remove there like shown in the video for the forester. Do you just pull that trim off, held only by clips?
 
#9 ·
https://www.amazon.com/gp/product/B00XC2X9WY/ref=oh_aui_detailpage_o00_s00?ie=UTF8&psc=1

This is what I'm doing. Plugging into 3rd row USB on the passenger side.

Might ditch the switch, and mount a 12v dimmer somewhere along the way.

Felt the light above is too far back when open to be effective?

Oh it's plenty effective even that far back. It's super bright. I believe there are photos of it in another thread. And looking back, if I had to do it again, knowing what I know now, it's not that difficult of an install. I can answer any questions anyone has about this install and how it differs from the youtube instructional video for the forester. Here are some another related threads about the install.


https://www.ascentforums.com/forum/155-diy-how/3429-lift-gate-led-add-light-install-help.html
https://www.ascentforums.com/forum/155-diy-how/4213-how-remove-re-install-tube-gasket-lift-gate.html
 
#10 ·
Are you guys installing a light using USB in 3rd row? Where is it being placed at? I too find it extremely dark. The light now is so dim doesn't really show anything at night time. I am looking for something easy to install.
 
#11 ·
That's the first person I've heard of using that solution. Personally it's not a clean / hardwire solution that I'd be happy with but to each their own. Like I said previously, the subispeed lift gate light is a fantastic solution that is not that difficult and now that I've done it I can walk anyone through it.
 
#15 · (Edited)
Think it looks great! Downward facing soft warm light, that’s independently controlled will make life easier when digging around the back during the night.

However before I go and attach this I’m gonna see what

1) Extending the on time of the inside lights will do along with changing out the bulbs to brighter warm LEDs
2) Changing out the cargo bulb to a brighter LED

But it looks like it wouldn’t be difficult to pull power from the cargo light and also put a 12v dimmer switch under the 12v outlet using these internals (so it stays protected)

PWM Dimming Controller For LED Lights or Ribbon, 12 Volt 8 Amp,Adjustable Brightness Light Switch Dimmer Controller DC12V 8A 96W for Led Strip Light By Zitrades https://www.amazon.com/dp/B007V1B0W8/ref=cm_sw_r_cp_api_GZcUBbWNZ8EF2

Definitely no longer a plug and play solution but the light is exactly where I need it and will be dimmable.
 

Attachments

#16 ·
Nice work! This is good to know there are now multiple ways to light up the trunk area. People can choose whichever method they are more comfortable with.
 
#38 ·
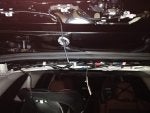
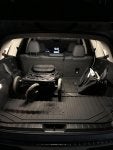
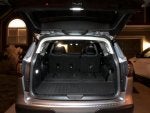
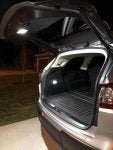
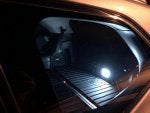
Subispeed order arrived today. Broke out the panel clip tool set and started working on it. I needed to remove the upper panel that covers the rear view mirror camera and the driver side down panel on rear window. I took the screw pin out on liftgate lower panel at lower left corner of window, reached in and popped the first push clip on liftgate panel. Popped the small panel where the light fits in. Poked a fish tape thru a long narrow hole I could see from corner by window and it came out the panel hole. Hooked the light wire on fish tape and pulled it thru. plugged in LED light and snapped it in to position on liftgate. Ran wire up along side of existing harness and taped when needed.

Second wire with the bigger connectors, was a bit more of a challenge. Removed the interior panel at rear of ceiling, 4 white push pin clips. Needed something flexible I could feed through the rubber grommets and tubing from liftgate to body (drivers side) a piece of THHN 12ga wire was perfect and I fed it thru from body to door. Taped the white and red wire from provided harness and pulled them through. Pushed the ends into the connector and taped it to wire from LED light.

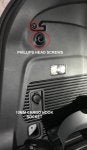
Next was lower interior panel where exiting cargo light and Cig lighter is. Remove 2 screws, one inside the cargo net hook and the other just above that behind a little round plug cover. Loosen the upper panel, one clip to reach inside and pop with tool. Then lower panel has 1 clip that needs to come out also. Pop the cargo light out and unplug the connector. You will be able to reach between the panel and body and view the seatbelt retractor for drivers side 3rd row. Route the cable down and around the pin you popped out and it will not get in the way of seat belt. Reach further down and you will find gray harness that is wire from cargo light pull it out and plug it into the big connector on LED light harness. The LED may light now, depends on how long you've had the rear liftgate open. Other connector will get poked back through the hole in panel where the cargo light mounts and plugs into cargo light. If you routed the wire correctly and didn't leave extra slack somewhere you should be able to just pull the inline fuse through the cargo light hole (so if it blows sometime you won't have to take all the panels off to change it). Tested it all out and works great.

I put things back together testing as I went. Time spent was a little over 2 hours from start to finish, but I'm confident it could be done in well under an hour if I had to do it again. I spent quite a bit of the time sorting out how to take it apart.

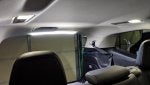
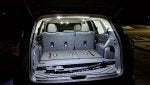
Really happy with the outcome, now I'm ordering the LEDs for other lights.
 
#39 ·
Did the Subispeed rear lift gate LED panel install this afternoon. It's really not that bad an install. For me, I soldered in about a 9-12 inch long wire extension to the large harness extension (the one that taps into the driver’s side OEM light).
Took me about two hours (including soldering work).

There are 4 screws to take out for the rear trunk panel cover - one at each lower corner of the rear glass panel, and two hidden underneath the passenger side trunk lid handle (you can pry off the handle “cover” to get access to the screws - look for the little screwdriver pry slot on the passenger side end of the handle).

Honestly, the hardest thing was threading the harness up through the rubber “snorkel” and fishing it back out in the other side.

Agree the whole thing could be done in about an hour if you know what you’re doing and what to expect.
 
#40 ·
Curious: why put a light on the door that will be blocked when you access the rear of the vehicle? It's better to put at least one light on the header bar across the top of the vehicle's door frame. No need to pull extra panels off the rear hatch, no need to run longer wires. Yes, it may need to be surface mounted but this is where Subaru should put a light, not that crap on the driver's side rear.
 
#41 · (Edited)
Agree'd.

As a someone who directs, shapes, and modifies light for a living (photographer) it made no sense to me to put a light behind directly behind my head pointed towards the floor to look into an all matte black cargo area which contains a black baby stroller and black cargo organizer. I'd cast a shadow at whatever Im looking at. But I've heard good results form those that have done it.

A few posts up (Post #14 and #15) I have test mounted an LED strip (warm LED with frosted lens) at 12 o clock I got off Amazon for $12. USB powered but I am awaiting my 12v dimmer and some free time to install. Will document when installing. 12v dimmer will be installed below the 12v outlet and be protected from cargo.Will tap into the power wire of the current cargo light. Definitely won't have the OEM look, but its almost invisible to me when mounted. And having a dimmer function is really nice for tailgating, etc. If I was doing night photography/camping I'd add an additional red one (led brake light) too.
 
#45 ·
There's some difference between some of the clips, so, I'd look it up on parts.subaru.com - you can order it from your dealer or online. It's usually free shipping if delivered to the dealer, but price may be a little more depending on your dealer, so, check both prices.
 
#50 ·
Just had the opportunity to disconnect my trailer under the hatch light last week and it was perfect. Light over the exact area I needed it. I have still been happy with the turn out of the light.
 
#55 ·
I think that's installed incorrectly... you should practice and do it again...


That's terrible. Pretty sure that's all wrong. You should practice by doing it again... on my car... with the one that's still sitting in the box uninstalled. :grin: :tango_face_wink:

Seriously, if trickery won't work, I'm at the point I'd pay someone to install mine. I just don't have the time.

Looks great! Glad to see it was a good buy, and can't wait to finally see mine leave the box. :plain:

Any tips to make it a quick install? Or anything I should watch out for? Or do you live near NY Metro area and wanna earn some cash or a steak dinner or something?
 
#56 ·
I did not have to remove any panels on the left inside of the car. You can just take the screws and 10mm bolt then pop the panels just enough to run the wires.
Find the fuse and get some extras if you can find them. My first one blew and I couldn't find any of the same size so I cut out the fuse that came with it and installed a mini fuse like what's in the car's fuse box and put a 7.5 in there.
I will say I did this the same day I replaced the timing belt on my 09 Impreza. The timing belt took about an hour, the light install took almost 2 lol.
 
#59 ·
If it has not been mentioned, the install is much easier if you remove one of the rubber conduit pieces. Feeding a wire from the top in to the hole is hard enough, then feeding it down the bend, forget that.

You can pull the rubber off, feed a wire to pull the cable though then the white clip comes out really easy using a small flat head to release the 4 clips holding it in place. Once its off it is easy to replace the rubber then slide it back in the place. Took me about 45 mins after reading this and that was some time wasted in trying to feed the cable down the rubber in one shot.

I did a dumb and blew the fuse in the line though. So stopping at home depot later on to fix that. I am thinking about removing the middle connection and just soldering the wires together then shrink some wire cable on it to make it really clean.
 

Attachments

#60 ·
Just finished installing this, took a bunch of pictures for future reference that I’ll post once I put some text on them. Appreciate the tips others have left so I’d like to contribute

Overall the kit is ok, needs something more secure than the spade connectors so I sealed in self fusing silicone.

Pros: Decently bright, maybe 70 actual lumens. I was wearing my Gen 1 Surefire Saint Headlamp to install it and its max 100 honest lumens (not the EBay and Amazon seller lumens).
The headlamp was almost as wide and a bit brighter.
Allowed me to swap out license plate bulbs to LED since the panel was off
Easy plug and play.

Cons:
As I suspected at my height (6’) with my head being right up against the light it blocks a large portion of the light when using the trunk.
As I was cleaning up, I needed my headlamp to see which was the whole reason I did this to begin with.
6000k color temp (I prefer warm for interior LED)
Harsh undiffused light.

Would I buy it again? No

Will be going forward with my cargo headliner project when I find a 12V warm led strip with frosted cover. The one I previously purchased is perfect but got extremely hot once I put 12V to it, as it was designed for 5V. I was hoping it was one of those 5-24V LED strips ?
 
#61 · (Edited)
Pros: Decently bright, maybe 70 actual lumens. I was wearing my Gen 1 Surefire Saint Headlamp to install it and its max 100 honest lumens (not the EBay and Amazon seller lumens).
:tango_face_surprise Man, that's from a while ago, ain't it?! I'm a Flashaholic as well. :tango_face_wink::nerd:

It's hard to beat a good head-lamp for all-around utility.

This almost makes me think: I got a Firepak from SF's Black Friday sale, and my intent was - and current practice has been - to use it to supplement the battery in my old iPhone (which rides on the dash as the display for my Valentine 1; I get a weeks' worth of commuting with this setup, but for longer road-trips, the extra battery pack means I don't have to trail a cable out to the driver's side of the dash). Maybe I should just stick it in the trunk area, instead? 1500 lumens via MaxVision optics (when cranked all the way up) lights up a decently broad area.

OK, sorry, back to the scheduled programming! :smile_big:
 
#65 · (Edited)
Some notes and pictures you might find helpful

Tools required
  • Philips Screwdriver #2 (bag hook, the screw above it, handle, and the 2 plastic pieces near the glass)
  • Small Flat screwdriver (removing hatch handle cover)
  • 10MM socket with extension for cargo hook removal
  • Trim removal tools (to get your fingers into the edge of the panel)


A few notes/tips

  1. Compress/shorten the rubber tube and pull it towards you. Insert the wire in the void, took 5 seconds to get through(Plenty of space). Make sure to properly seat the gasket again, because water will run into the inside of your headliner if not. Was mentioned above, but you'll need to pull out the white plastic to properly seat the gasket.
  2. For the most part, pulling panels parallel to the face should prevent damage to the clips. It will be loud, like crushing an empty water bottle.
  3. Wrap connection with self fusing silicone tape. I prefer it to electrical tape because it doesn't get sticky later
  4. Good time to change your license plate bulbs if you want to go LED
  5. Did not need to remove the cargo cover/bottom section like the Forester video, just pulled the driver side (12v panel) after removing the 2 screws and 1 bolt

Links for tools speciality items

https://www.amazon.com/X-Treme-Tape...J51XYTI/ref=sr_1_4?s=hi&ie=UTF8&qid=1545086568&sr=1-4&keywords=self+fusing+tape

https://www.amazon.com/Universal-Da.../ref=sr_1_9?s=hi&ie=UTF8&qid=1545086611&sr=1-9&keywords=trim+panel+removal+tool
 

Attachments

#70 ·
Very nice!

Question though - these strips have adhesive to hold it in place. However where I live it gets to 115F in the summers (likely hotter inside a vehicle sitting in the sun). I'm worried that the strip adhesive will give way over time. Is there another way to affix it to the trim so that it doesn't come off in hot weather?